웹개발 프로젝트 시 굿즈를 판매하는 웹페이지를 만들면서
아임포트 API를 활용한 가상 결제 기능을 사용하게 됐다.
아임포트 API는 개발자를 위한 무료 결제연동 서비스로
사업자 등록증을 연결하면 결제가 가능하다고 하는데, 그것까진 시도해보지 않아서 모르겠다.
처음에는 API를 사용해본 경험이 별로 없어서
시작 전부터 이거 어떻게 풀어나가야하나 고민을 많이 했다.
그런데 하다보니 생각보다 어렵진 않았다.
참고로, 정통 방식은 결제 후 결제 정보 확인을 위해 API를 통해 결제 데이터를 가져오는 기능을 써야한다.
그런데 나는 결제 정보를 비공개로 넘기는 방식을 선택했다.
여기서는
1. 아임포트 API 시작하는 방법 과
2. 결제창 jsp 연결,
3. 결제창에서 결제 정보 비공개로 넘기기
를 포스팅할 예정이다.
1. 아임포트 API 시작하기
① 아임포트 가입 & 로그인
아임포트 API를 이용하려면 일단 가입해야한다.
www.iamport.kr/
개발자를 위한 무료 결제연동 API, 아임포트
아임포트를 import하세요. 아임포트의 풍부한 REST API 기능을 이용하면 결제연동이 훨씬 쉬워집니다. 지금 시작하세요.
www.iamport.kr
아임포트 사이트에 들어가면 PG가입하기 라는 부분이 뜨는데,
'PG가입하기'가 아니라 맨 오른쪽 상단에 파란색 대시보드 버튼을 누른 후
나오는 페이지에서 회원가입을 눌러 가입을 진행해야 한다.
가입이 완료되면 다시 오른쪽 상단 파란색 대시보드 버튼을 눌러 로그인 한다.
② 결제창 연결에 필요한 식별코드&키 확인
로그인 후 시스템설정 > 내정보 탭에 들어가면 결제창 연결에 필요한
가맹점 식별코드와, REST API 키, REST API secret 키를 확인할 수 있다.
자세한 사용 방법은 추후에 결제창 jsp 연결 시 자세히 포스팅 할 예정..!

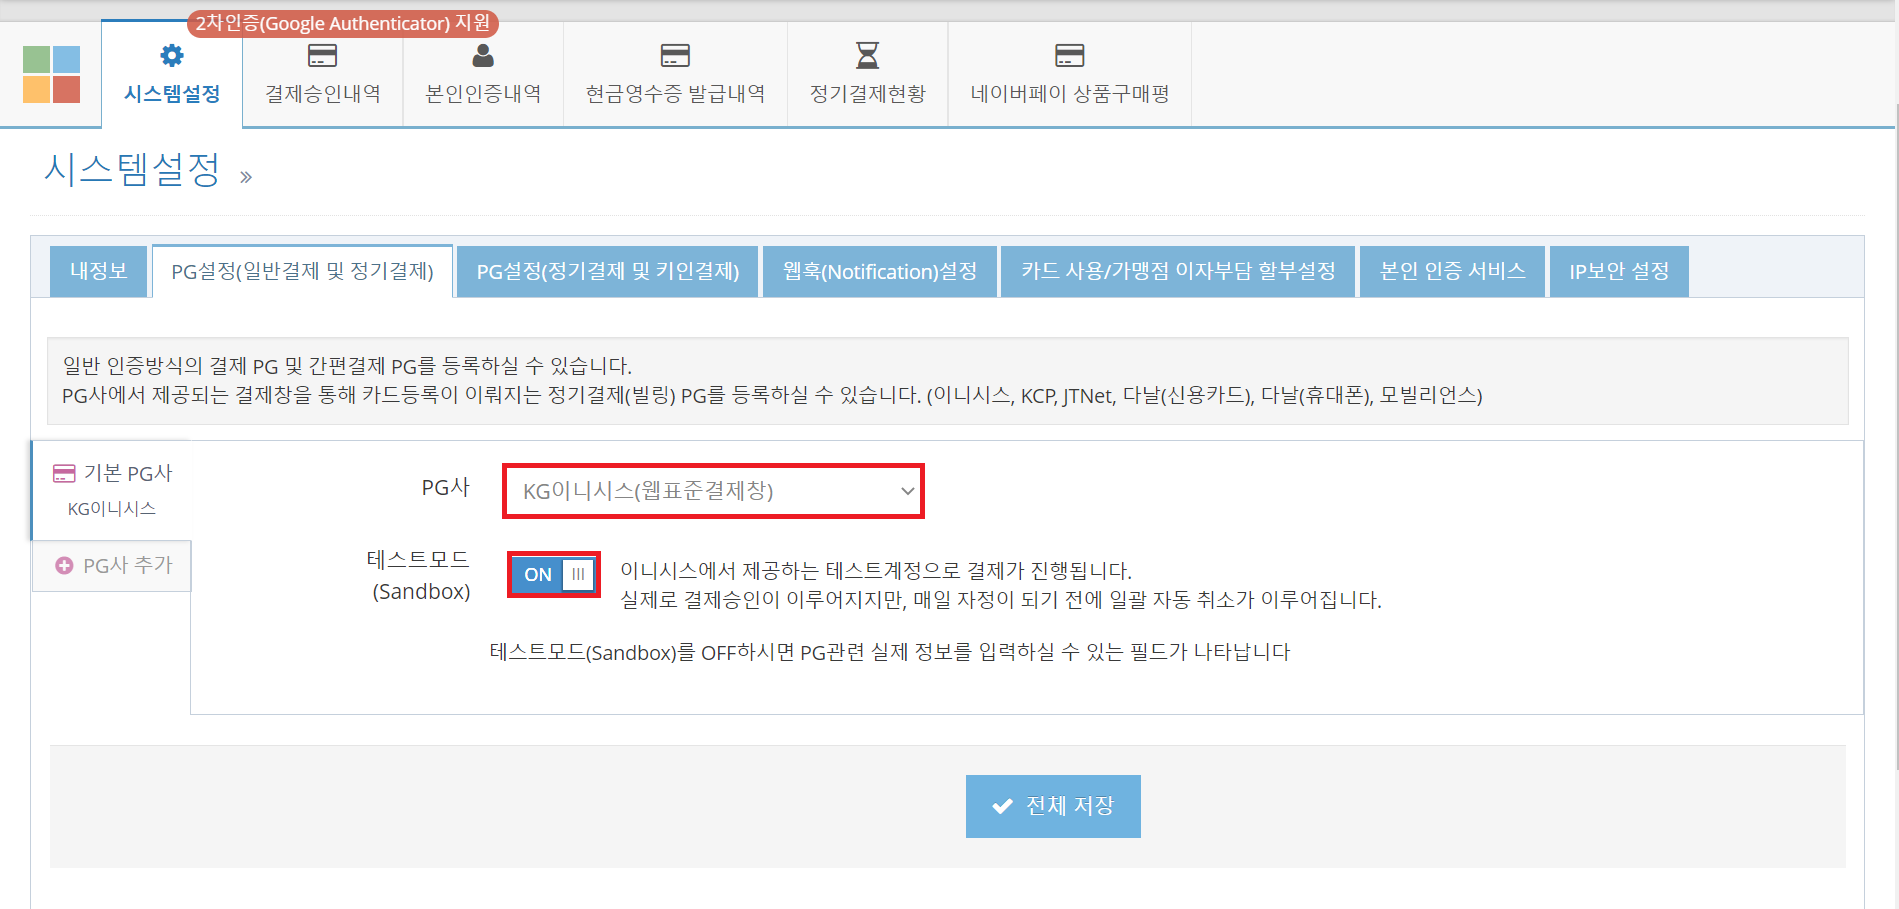
③ 결제 방식 선택 & 가상결제모드 (테스트 결제모드) 켜기
결제 방식도 여러가지가 있기 때문에 어떤 방식으로 결제기능을 연결할건지 선택해야 한다.
시스템설정 > PG설정 탭에 들어가면 네이버페이, 카카오페이, 페이코 등 여러가지가 있는데
이 중에서 결제 방식을 선택할 수 있다.
나는 여러 PG사를 한꺼번에 지원해주는 KG이니시스를 선택했다.
(네이버페이, 카카오페이 등 기본적인 결제 기능은 KG이니시스에 다 있다)
KG이니시스가 아니라 기능을 하나씩 선택해서 여러 PG사를 넣으려면 추가 비용이 붙는다.
나는 사업자 등록증이 없기 때문에
가상 결제모드를 위해 테스트모드를 ON으로 켜주었다.
참고로 가상 결제는 결제해도 밤 12시 전에 돈이 자동으로 환불된다.

2. 결제창 jsp(또는 html) 연결 & 데이터 전달
① 결제창 jsp(또는 html) 만들기
아임포트 가입 후 기본적인 세팅을 마쳤다면,
결제창 jsp (또는 html) 를 만들 수 있다.
이에 대한 기본적인 방법은 아래 링크에서 확인할 수 있다.
(아임포트에서 자세하게 적어놓았다)
www.iamport.kr/getstarted
개발자를 위한 무료 결제연동 API, 아임포트
아임포트를 import하세요. 아임포트의 풍부한 REST API 기능을 이용하면 결제연동이 훨씬 쉬워집니다. 지금 시작하세요.
www.iamport.kr
아래 코드는 위 링크를 참고해 내가 만든 jsp이다.
|
1
2
3
4
5
6
7
8
9
10
11
12
13
14
15
16
17
18
19
20
21
22
23
24
25
26
27
28
29
30
31
32
33
34
35
36
37
38
39
40
41
42
43
|
<%@ page contentType="text/html; charset=utf-8"%>
<%@ taglib prefix="c" uri="http://java.sun.com/jsp/jstl/core" %>
<!DOCTYPE html>
<html>
<head>
</head>
<body>
<script type="text/javascript" src="https://code.jquery.com/jquery-1.12.4.min.js" ></script>
<script type="text/javascript" src="https://service.iamport.kr/js/iamport.payment-1.1.5.js"></script>
<script>
var IMP = window.IMP;
IMP.init('가맹점 식별코드');
IMP.request_pay({
pg : 'inicis',
pay_method : 'card', //카드결제
merchant_uid : 'merchant_' + new Date().getTime(),
name : '주문명:결제테스트',
amount : 12000, //판매가격
buyer_email : '구매자 아이디',
buyer_name : '구매자 이름',
buyer_tel : '연락처',
buyer_addr : '주소',
buyer_postcode : '우편번호'
}, function(rsp) {
if ( rsp.success ) {
var msg = '결제가 완료되었습니다.';
msg += '고유ID : ' + rsp.imp_uid;
msg += '상점 거래ID : ' + rsp.merchant_uid;
msg += '결제 금액 : ' + rsp.paid_amount;
msg += '카드 승인번호 : ' + rsp.apply_num;
pay_info(rsp);
} else {
var msg = '결제에 실패하였습니다.';
msg += '에러내용 : ' + rsp.error_msg;
location.href="goods_pay_fail.do?error_msg="+rsp.error_msg;
}
});
|
cs |
1,2번 줄에 jsp용 코드를 넣었다.
가맹점 식별코드는 1-2번에서 확인했던 가맹점 식별코드를 복사해서 그대로 넣으면 된다.
나머지 주문명, 가격, 구매자 아이디 등 구매자에 대한 정보는 클라이언트에게 form으로 받은 후
jsp로 데이터를 넘겨 '${payInfo.product_name}' 와 같은 형식으로 데이터를 전달했다.
결제 성공 시 pay_info(rsp)라는 자바스크립트 메소드를 호출해 결제 정보를 넘기도록 만들었다.
결제에 실패할 경우에는 결제 실패에 대한 안내창을 별도로 만들어 연결되도록 했다.
(결제 실패에 대한 이유도 받아서 알려준다)
여기까지가 아임포트 API를 통해 구현한 기본적인 부분이다.
다음은 결제창 jsp에 있는 정보를 비공개로 서버로 보내주는 코드이다.
② 비공개 방식으로 서버로 결제정보 전달
위에 적은 코드 바로 아래 결제정보 전달하는 코드를 작성했다.
|
1
2
3
4
5
6
7
8
9
10
11
12
13
14
15
16
17
18
19
20
21
22
23
24
25
26
27
28
29
30
31
32
33
34
35
36
37
38
39
40
41
42
43
44
45
46
47
48
49
50
51
52
53
54
55
56
57
58
59
60
61
62
63
64
65
66
67
68
69
70
71
72
73
74
75
76
77
78
79
80
|
function pay_info(rsp){
var form = document.createElement('form');
var objs;
objs = document.createElement('input');
objs.setAttribute('type', 'hidden');
objs.setAttribute('name', 'buyer_name');
objs.setAttribute('value', rsp.buyer_name);
form.appendChild(objs);
objs = document.createElement('input');
objs.setAttribute('type', 'hidden');
objs.setAttribute('name', 'buyer_phone');
objs.setAttribute('value', rsp.buyer_tel);
form.appendChild(objs);
objs = document.createElement('input');
objs.setAttribute('type', 'hidden');
objs.setAttribute('name', 'member_email');
objs.setAttribute('value', rsp.buyer_email);
form.appendChild(objs);
objs = document.createElement('input');
objs.setAttribute('type', 'hidden');
objs.setAttribute('name', 'buy_addr');
objs.setAttribute('value', rsp.buyer_addr);
form.appendChild(objs);
objs = document.createElement('input');
objs.setAttribute('type', 'hidden');
objs.setAttribute('name', 'buy_product_name');
objs.setAttribute('value', rsp.name);
form.appendChild(objs);
objs = document.createElement('input');
objs.setAttribute('type', 'hidden');
objs.setAttribute('name', 'buyer_buyid');
objs.setAttribute('value', rsp.imp_uid);
form.appendChild(objs);
objs = document.createElement('input');
objs.setAttribute('type', 'hidden');
objs.setAttribute('name', 'buyer_merid');
objs.setAttribute('value', rsp.merchant_uid);
form.appendChild(objs);
objs = document.createElement('input');
objs.setAttribute('type', 'hidden');
objs.setAttribute('name', 'amount');
objs.setAttribute('value', rsp.paid_amount);
form.appendChild(objs);
objs = document.createElement('input');
objs.setAttribute('type', 'hidden');
objs.setAttribute('name', 'buyer_card_num');
objs.setAttribute('value', rsp.apply_num);
form.appendChild(objs);
objs = document.createElement('input');
objs.setAttribute('type', 'hidden');
objs.setAttribute('name', 'buyer_pay_ok');
objs.setAttribute('value', rsp.success);
form.appendChild(objs);
objs = document.createElement('input');
objs.setAttribute('type', 'hidden');
objs.setAttribute('name', 'buyer_postcode');
objs.setAttribute('value', rsp.buyer_postcode);
form.appendChild(objs);
form.setAttribute('method', 'post');
form.setAttribute('action', "goods_pay_success.do");
document.body.appendChild(form);
form.submit();
}
</script>
</body>
</html>
|
cs |
자바스크립트로 데이터를 전달하는 form을 별도로 만들어
결제 정보를 담은 후 전달하는 방식이다.
조금 번거롭긴 하지만, post 방식으로 form을 전달하니 정보가 노출되지 않아 안심이 됐다.
이렇게 하니 결제 정보가 잘 넘어갔다.
클라이언트 계정으로 로그인한 후 구매 내역을 확인해보니 결제 정보가 잘 나오는 것을 확인할 수 있었다.
'API' 카테고리의 다른 글
| API 아임포트 결제 API : ③환불하기 (0) | 2021.01.22 |
|---|---|
| API 아임포트 결제 API : ②결제 정보 가져오기 (0) | 2021.01.05 |
